Goal
Remember no one but you will know exactly what your source looked like. This might be a different cat than is shown in the image I looked at!
Inspiration
A step-by-step watercolor tutorial I found online, plus images of my friend's short-haired tuxedo cat. First, follow the tutorial and make a small painting that will become a card as part of a set that will be given as a gift. Practice using masking tape and masking fluid for the first time.Materials
- Some probably hot-press watercolor paper I cut into approximately 3.5" • 5" rectangles.
- Various color papers cut into slightly larger rectangles for 'faux' matting.
- A pack of white 5.25" • 7" blank white scored cards and envelopes.
- Some quality watercolor brushes my aunt gave me upon her trip from England.
- A 24 pan set of Yarka St. Petersburg Artists' Watercolors she also gave me.
- A roll of 1" 3M Scotch Masking Tape.
- Winsor & Newton Water Color Art Masking Fluid in 'Slightly Pigmented".
- Old/cheap brushes for applying the masking fluid.
- A hard back vinyl-cover binder to tape the paper to.
- A jar for water, and lots of rinses and refills.
Step 1: Tape, sketch, and mask.
Tip: Stick the tape to clothing before applying to the paper. This is the first time I've tried it, but I read online that this will keep it from tearing the paper.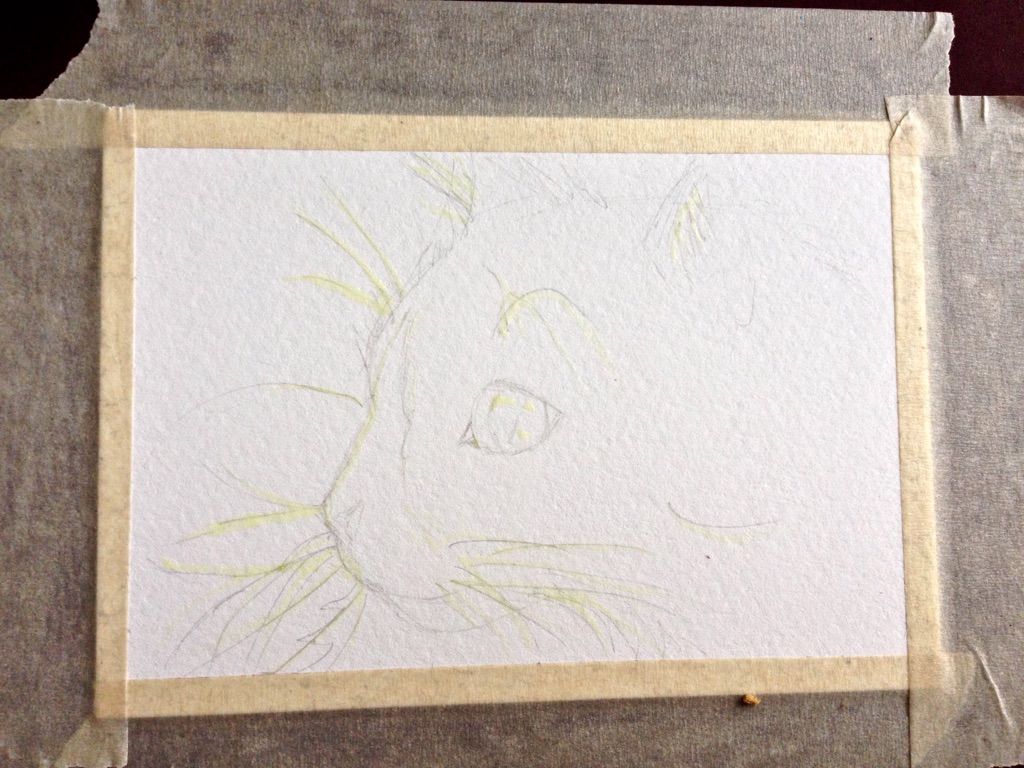
Step 2: Wait at least 45 minutes for masking fluid to dry.
Thoroughly wash your masking fluid brush(es) with a little soap and water. Rinse well. Rinse the water jar thoroughly.Step 3: Prepare your color scheme.
Start with the outside circle. Choose three primary colors. I learned this trick from a local artist who was doing a watercolor demo at a local art store. I've never tried it before.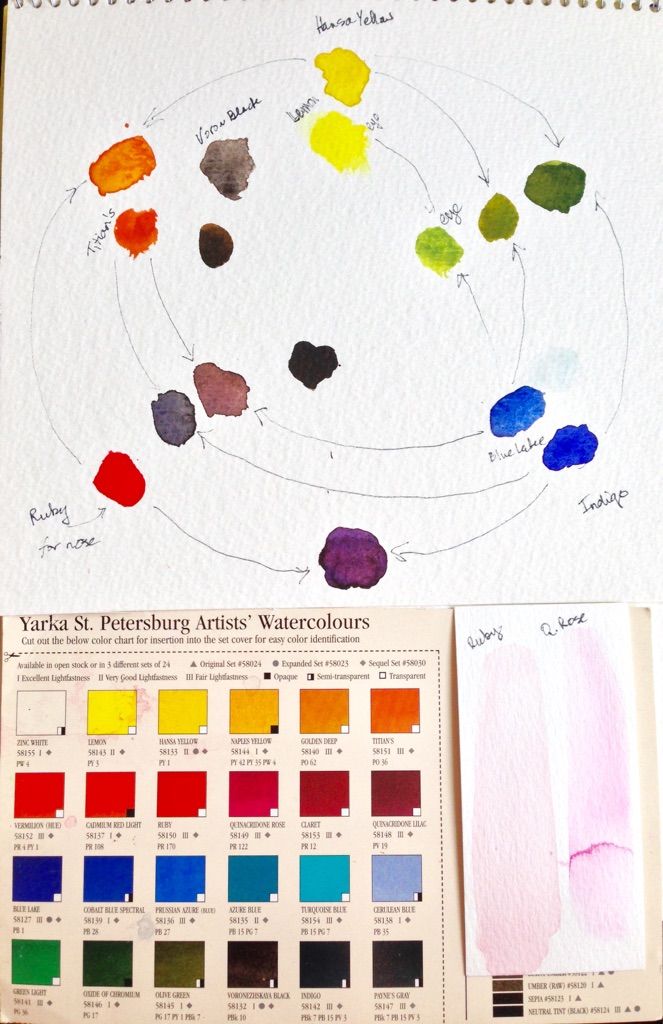
I started with Hansa Yellow (transparent), Indigo (Semi-transparent), and Ruby (transparent).
I chose Indigo because it was my darkest blue and the tutorial suggested "it is so easy to achieve much more interesting blacks and grays by layering two or more complimentary colors on the paper. A classic mix is a dark blue, such as ultramarine or prussian blue and burnt sienna (you can use any two colors that are opposite each other on the color wheel)."
I chose Hansa Yellow because to my eye, it best matched the yellow used in the tutorial, however as shown below, I have an 'inner circle' of sorts where I chose Lemon (transparent), and Blue Lake (transparent) (unlabeled, next to Indigo), because that combination gives a green that's closer to the cat's eye.
I chose Ruby because a wash of Ruby compared to a wash of Quinacridone Rose looked more like the final hue of the cat's nose.
I mixed Ruby and Hansa Yellow for an orange, that when mixed with Indigo created a too-black greenish blob (center of the diagram). I then chose Titian's (transparent) to mix with Blue Lake, and ended up with the bruise color next to it. Titian's mixed with Indigo is the better grey-black outside of that. Another option would be to use Voronezhskaya Black (semi-transparent).
Label your hues, diagram your mixes, and label final key colors like "eye" and "nose".
Step 4: Apply the background wash.
I used the same colors as in my finalized scheme: Lemon, Blue Lake, Ruby, and a touch of Quinacridone Rose for the pinker hues. This is still wet. I probably should have added more pigment for more intensity.See how the masking fluid resists the paint?
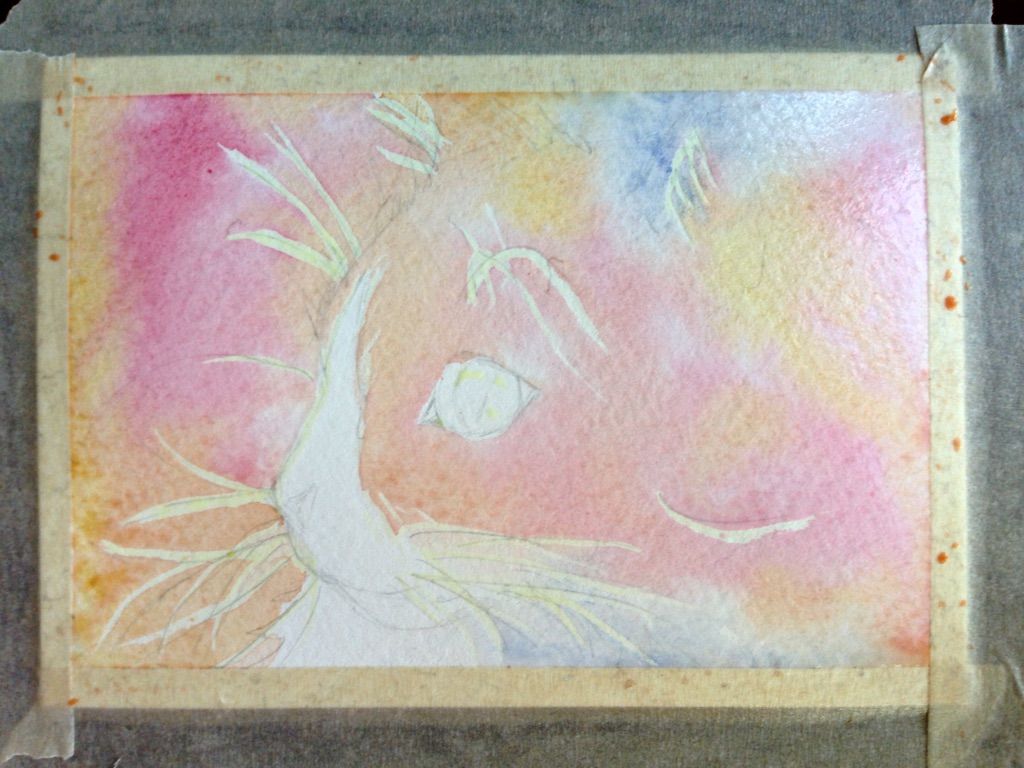
Step 5: Let the wash dry.
Rinse your brush(es) and change the water.Step 6: Apply the black foreground wash.
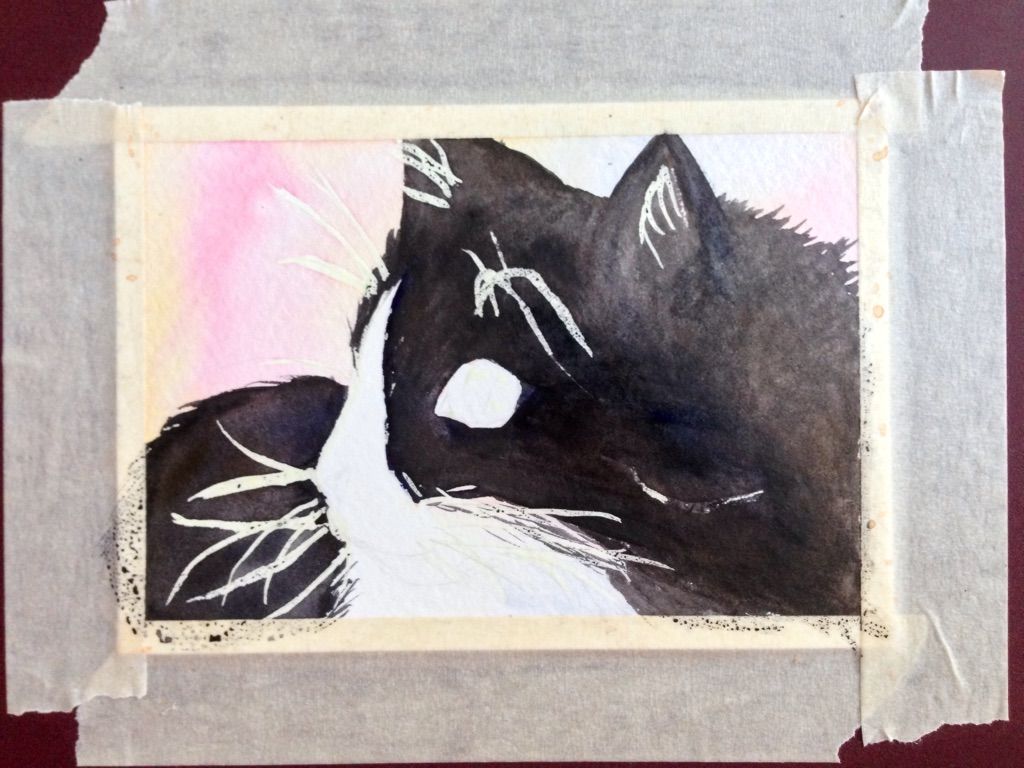
This is a mix of Titian's and Indigo.
Step 7: Let the foreground wash dry.
Rinse your brush(es) and change the water.Step 8: Apply the eye, the nose, and the shadows.
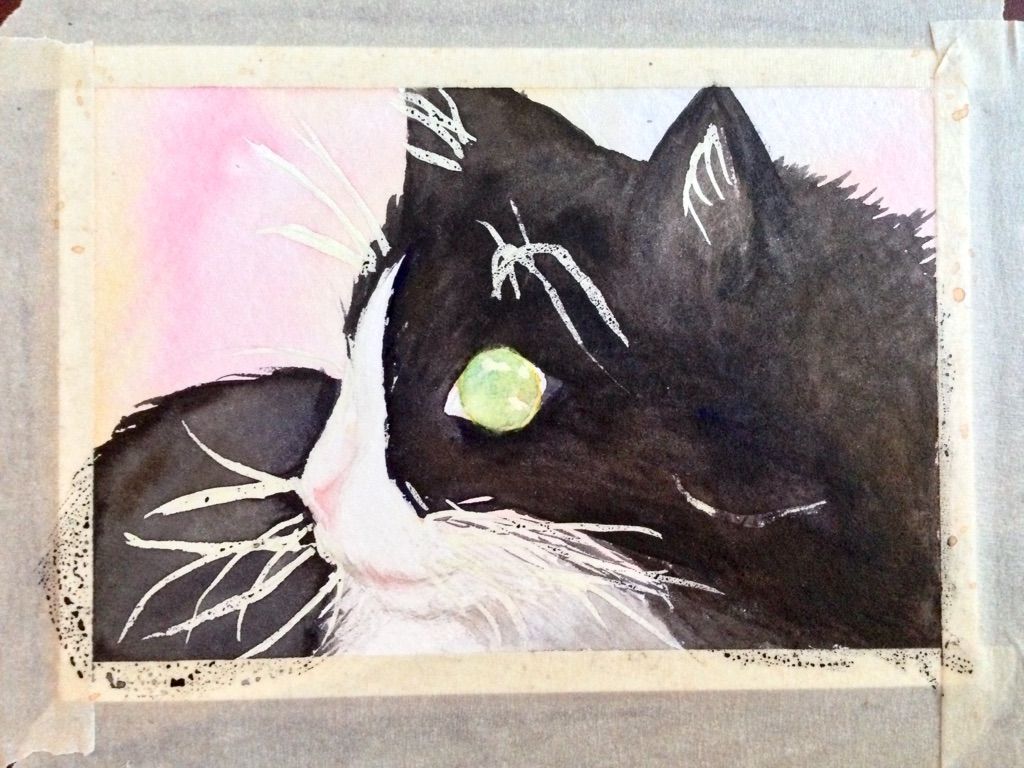
The eye is Lemon and Blue Lake. The nose and the mouth have ruby, and the shadows are diluted Titian's and Indigo.
Step 9: Apply the focal point, the pupil. Add texture to the fur if necessary.
Titian's and Indigo, leaning slightly toward the Indigo. Watercolor fades as it dries, so I had to add another layer of black to the pupil.
Step 10: Let the painting dry.
I can't find anything definitive online about long long until the paint will be dry, but most sites agree you shoudn't leave the masking fluid on more than 1-2 days.Rinse your brush(es) and change the water.
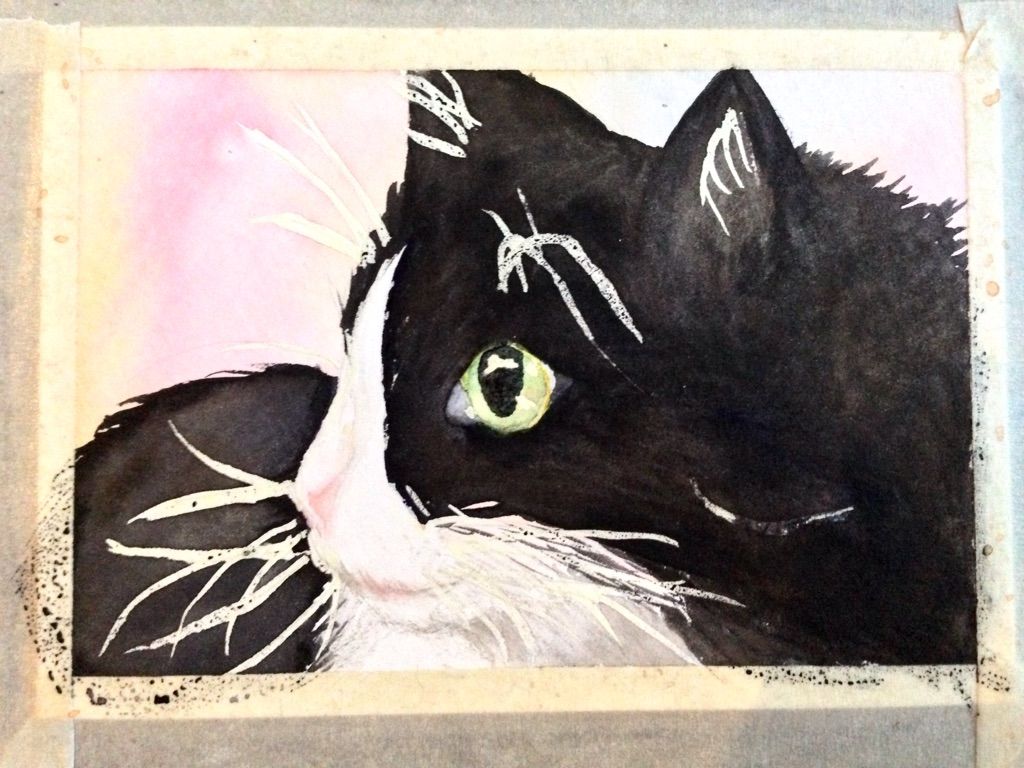
Step 11: Remove the masking fluid.
Do this gently with a white eraser. The eraser may fade some of the watercolor.Step 12: Tone down the whites where necessary.
Use diluted Indigo and Titian's to create shadows, "moving" some of the whiskers "back." Add a touch of blue to the eye to indicate a reflection of an object.Step 13: Remove the masking tape.
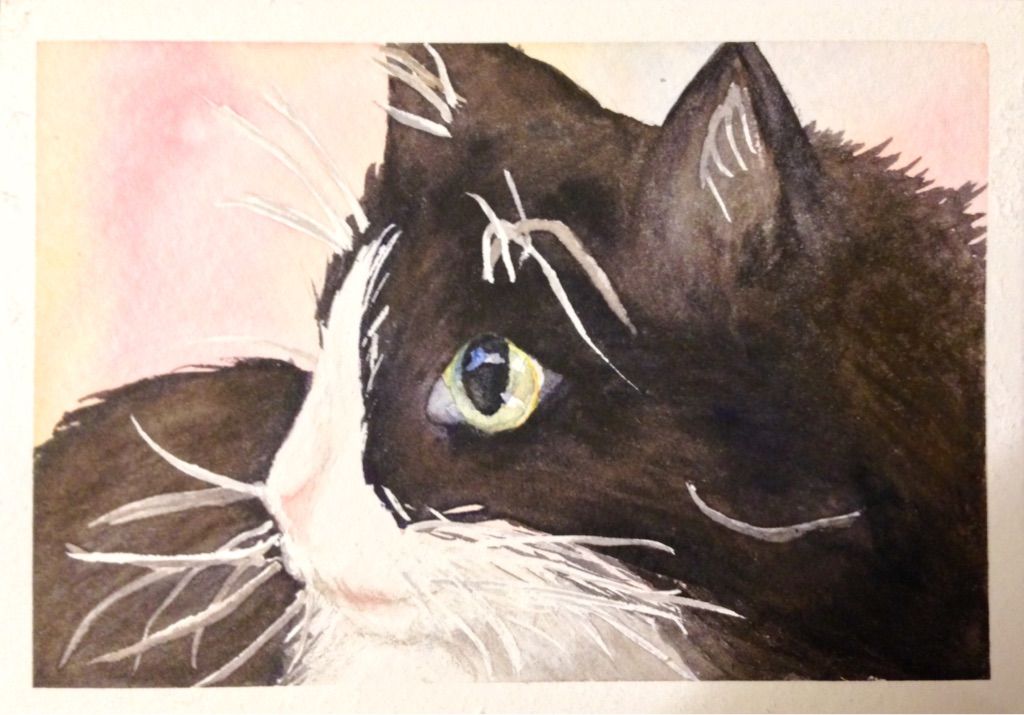
Do this carefully, slowly, peeling back almost on top of itself, but at an angle.Results
The masking tape tore the edge -- I need different tape.The whiskers were too wide -- I need a finer brush for applying masking fluid. Also inner-ear hairs on left weren't supposed to be white that far back. (I ended up applying black to fix some of the whiskers.)
The colors are more faded than I wanted -- I need to use more pigment, to not be afraid of applying 'too much' and remember that it will fade as it dries.
Overall, I'm delighted with my first-ever watercolor animal!
Also, this is greeting-card size, so it will do double duty as part of
a set of greeting cards I'll give as a Christmas gift.
Also, this is greeting-card size, so it will do double duty as part of
a set of greeting cards I'll give as a Christmas gift.
No comments:
Post a Comment